Archive | Bare essentials RSS feed for this section

I’d Tapenade That Part II. Or, I’m too lazy to devise a clever title.

21 Jan

I’d like to tell you that the reason I haven’t posted in almost two months is because I’ve spent my summer break in Mykonos, lazing about beside the azure waters of the Mediterranean drinking ouzo and developing a steamy romance with a charming, muscular and deeply tanned Greek boy named Kostos.

But the sad reality is that I’ve actually been watching re-runs of Project Runway and eating cheese. So really, I’ve got no excuse.

Amongst all this laziness, however, my flatmates and I found the time to host an evening soiree (how’s that for tautology?) so we could show our parents our new abode. Now don’t get ahead of yourself here and assume I spent hours in the kitchen preparing. Oh, no. Instead I decided what I was going to make roughly three hours before they were due to arrive.

But the beauty of this recipe is that it only really takes half an hour to prepare and most of the ingredients can be found in your cupboard or fridge. It builds on a recipe I devised a few months back, albeit with a little more pompousness thrown in for good measure. Green olive tapenade* spirals are an easy and cheap addition to any soiree, evening or otherwise (which doesn’t really make sense) and are also quite delicious. Plus you might be able to get away with telling people you learned the recipe off a little old Greek woman on your trip abroad.

*As a side note, my computer tried to auto correct ‘tapenade’ to ‘tapeworm’. Well, I thought it was funny. But I’ve also spent the last two months in front of my television.

Green Olive Tapenade Spirals.

Green Olive Tapenade Spirals

Makes 32

1 quantity of green olive tapenade (recipe found here)

4 sheets of puff pastry, thawed

olive oil to brush


1. Preheat the oven to 200C and grease two baking trays.

2. Cut each sheet of pastry into eight strips.

3. On one end of each strip, place a small dollop of tapenade and roll into a spiral.

4. Repeat with remaining pastry.

5. Place the spirals on baking trays and lightly brush each one with olive oil.

6. Bake in the oven for around 15 minutes or until golden brown.

Reigniting the Passion.

8 Dec

For regular readers, the title of this post will make perfect sense – after having outdone myself in the laziness stakes and avoiding posting in over two weeks, I’ve finally found the inspiration needed to break free of the barbarically restrictive shackles of pure and unadulterated sloth. Or more, I’ve noticed my daily average page views have dipped to the wrong side of five.

Now for those that know me personally, you’ll know I’ve got a new flatmate. And for those that know her personally, you’ll know she loves to eat. So in an effort to both impress her and quell her relentless cries for food, I decided to whip up a deliciously moist (I hate the word but here it seems apt) banana, passionfruit and ginger cake, inspired by a recipe from The Australian Women’s Weekly’s bible, Bake.

The best part about this cake is that almost all the ingredients can be found in the fridge or pantry, or the slowly becoming moldy fruit bowl. I was happily able to continue in my constant state of humdrum lethargy and completely steer clear of the supermarket. And the other advantage was that it kept well in the fridge for almost two weeks, meaning constant nourishment for my darling demanding flatmate.

* As a side note, I will gladly acknowledge that this is my worst title to date.


Banana, passionfruit & ginger cake.

Banana, Passionfruit & Ginger Cake

Serves 12

125g butter, softened

3/4 cup (165g) firmly packed brown sugar

2 eggs

1 1/2 cups (225g) self-raising flour

1/2 tsp bicarbonate soda

1 tsp powdered ginger

1 cup mashed banana (roughly two large bananas)

1/2 cup (120g) natural yoghurt

1/4 cup (60ml) milk

Passionfruit Icing

1 1/2 cups (240g) icing sugar

2 TBSP passionfruit pulp, approximately

1 tsp powdered ginger

1. Preheat oven to 180c/160c fan-forced.

2. Grease 22cm round cake pan and line base with baking paper.

3. Beat butter and sugar in a small bowl with electric mixer until light and fluffy.

4. Beat in eggs, one at a time.

5. Transfer mixture to a large bowl; stir in sifted dry ingredients, banana, yoghurt and milk.

6. Spread mixture into pan.

7. Bake cake about 50 minutes and then stand in pan for 5 minutes.

8. Turn, topside up, onto a wire rack to cool.

9. Meanwhile, make passionfruit icing: Sift icing sugar into a small bowl and stir in enough of the passionfruit pulp to give a thick pouring consistency. Add powdered ginger to taste.

10. Spread the cake with the icing and serve.

For when your world comes crumbling down.

23 Nov

When thinking about my blog the other day (as I often do. Too often, perhaps. I need a life. I also need to stop putting the grand majority of what I write in brackets) I realised it had been over two weeks since I last posted. Some of you may welcome this extended break from me spamming your Facebook newsfeeds with self-indulgent blab but I’m sure my one (finally!) subscriber is missing me. C’mon, enlargements4u@mail.de, admit it.

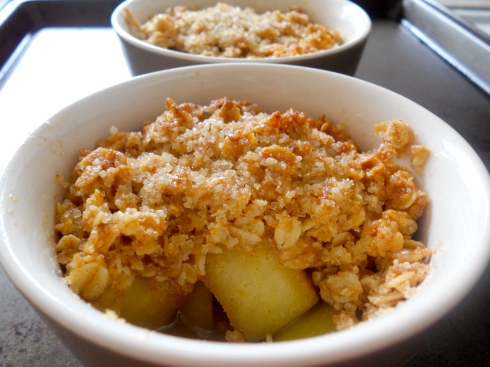
I made this recipe almost two months ago when my flatmate and I were feeling particularly angsty about university. We were approaching crunch time (i.e. last-minute essay pumping time) and needed sweet nourishment to last the night*. All we had was a sad green apple, some sugar, vanilla, spices and oats. OK, so that’s a bit of an exaggeration and we clearly survive on a bit more than that, but mouldy pasta does not a fine dessert make.

I’d also recently bought some adorable little ramekins and they were still begging to be used. So, if you haven’t already guessed from the puntastic title, apple crumble was the order of the evening.

This is probably the easiest dessert ever in the history of mankind ever to make. Seriously. You can use whatever scabby fruit you’ve got lying around and can even mix them all together to create some kind of wonderful concoction. This recipe uses oats but I’ve heard oats aren’t supposed to be used in the topping. Well I say to hell with tradition and here’s to cheap sustanence.

*I’m going to be honest here and admit we were actually preparing for a late-night Gossip Girl marathon.


Apple crumble.

Apple Crumble

Serves 2

1 medium green apple, peeled and chopped into cubes

1 TBSP caster sugar

1 tsp cinnamon

1 cup water

40g butter

1 TBSP plain flour

3 TBSP rolled oats

1 TBSP raw sugar

a few drops of vanilla essence

1. Place the apple, sugar, cinnamon and water in a medium saucepan and bring to the boil.

2. Reduce the heat and simmer for 10 minutes or until the apple is cooked through.

3. Remove from heat and leave to cool.

4. Preheat the oven to 180C.

5. In a large mixing bowl, rub together the butter and flour until the mixture resembles fine bread crumbs.

6. Rub in the oats, sugar and vanilla and set aside.

7. Grab two ¾ cup capacity ramekins.

8. Drain the apples and place half in each ramekin.

9. Top with the crumble mixture.

10. Place the ramekins on a baking tray.

11. Place the tray in the oven for 20 minutes or until the tops of the crumbles are golden. You may need to put the grill on for a few minutes to get a nice topping.

12. Remove from the oven and serve with lashings of cream or ice cream, quantity depending on mood.

All my posts are a little bit corny, but this one really takes the cake.

7 Nov

See what I did there? Aren’t I clever? It took me a good ten minutes to devise a name for this post – ten minutes that otherwise should have been spent writing an essay. But uni, schmuni.

My flatmate has been complaining of late that I always seem to insult her in my blog posts. Well, this post is intended to completely make up for that and shine a bright light on her (slowly) improving cooking skills. I will take no credit for this recipe, as the entire thing was her own creation. I will also take no credit for teaching her how to conjure up such a recipe, as my attempts at showing her how to cook always end up with me raising my voice and her evacuating the kitchen and me raising my voice because she left me alone in the kitchen. So the moral of this story is that I have taught her nothing and she consequently invented these corn cakes when I wasn’t at home.

But the girl did well. The cakes are deliciously fried yet bursting with enough nuggets of juicy corn to fool you into thinking they’re healthy. They’re good cold, too, as an ideal hangover cure. So congratulations, my dear, not only for creating a fantastic recipe, but for doing it so stealthily that you managed to avoid my cooking wrath.

Corn cakes.

Corn Cakes

1 400g tin of corn kernels, drained

1 potato, grated

1 egg, beaten

1/2 cup plain flour (or thereabouts. She’s bad with quantities)

salt and pepper

1 TBSP olive oil, for frying (ditto)

1. Mix together the corn, potato and egg until the mixture comes together.

2. Stir in the flour until you have a pancake batter consistency. The quantity of flour used is just a rough guide – keep adding flour until you get it right.

3. Season with salt and pepper.

4. Heat the oil in a large frying pan until hot.

5. Shape the mixture into tablespoon-sized balls and place in the frying pan, about 5 cm apart.

6. Squash the cakes down until flat and fry on each side for a few minutes, or until golden brown.

7. Remove from the frying pan and drain on paper towels.

8. Serve.

NB: You can add fresh herbs to these to make them a bit more exciting. Or even cheese. Cheese makes everything better.

Spice Up Your Life.

25 Oct

I know you must be cringing right now – and don’t worry, so am I – at the above reference. It’s not only socially unacceptable to know the name of and possibly like a Spice Girls song (not that I’m admitting anything here) but potentially worse to be seen reading an amateur food blog that alludes to the song in question.

But these girls make a good point. An array of spices can make any meal more exciting, whether it be a plain tomato-based sauce transformed into a curry, hamburgers made into kofta or peanut butter on toast revamped to become peanut butter on toast with cinnamon.

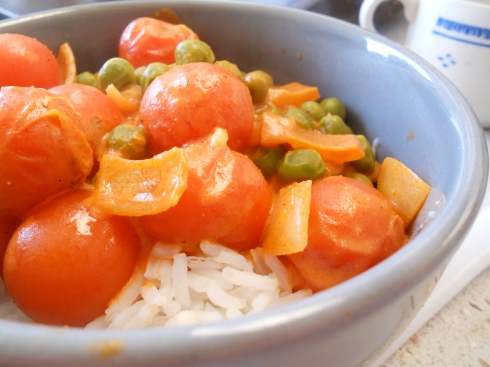
The other night I was feeling pretty lousy and was in no mood to cook something elaborate. Initially my thoughts were to go with my very delicious – yet admittedly very sad – fallback of tuna, peas and rice (which only involves throwing the latter two in a pot of boiling water before mixing them with a tin of tuna. Mmm.) but inspiration came in the form of a little jar of curry powder sitting at the very back of our pantry.

Curry is wonderfully simple, only requiring a few basic ingredients and a few minutes preparation. It’s a great way to use up vegetables that are clearly past it and quickly becoming compost-ripe and can be adapted to suit almost any type of vegetable or meat. You can also change up the spice mix if you so desire. This particular recipe is inspired by Nigella’s latest offering, Kitchen, and uses cherry tomatoes and peas, but by all means use whatever’s available and in season and whatever the bottom of your fridge desperately needs to get rid of.

Tomato & Pea Curry.

Tomato & Pea Curry

Serves 2

2 TBSP olive oil

1 large brown onion, peeled and chopped

1 tsp cumin powder

1 tsp fennel powder

2 tsp curry powder

1/2 tsp dried chili flakes

250g cherry tomatoes

1/2 cup frozen peas

1 TBSP tomato paste

1/2 cup coconut milk or regular milk

salt

1. Heat the oil in a medium saucepan that has a lid.

2. When hot, add the onions and fry, stirring occasionally, until fragrant.

3. Add the spices and fry for a further two to three minutes.

4. Add the tomatoes and the peas and cook, with the lid on, for twenty minutes.

5. Add the tomato paste and the milk and cook for a further 10 minutes.

6. Season to taste.

7. Serve with rice.

Revenge of the Soup.

4 Oct

In order to maintain my incessant laziness, I’ve decided that every time I make soup, I’m merely going to insert the word ‘soup’ into the title of a Star Wars movie. Admittedly The Soup Strikes Back was a happy coincidence and I doubt Seriously Simple Jedis was – or ever will be – a contender for the sci-fi saga, but this post is an unabashed and intentional rip off. So now that I’ve got that off my chest, let’s move on to the next installment of Soup Wars.

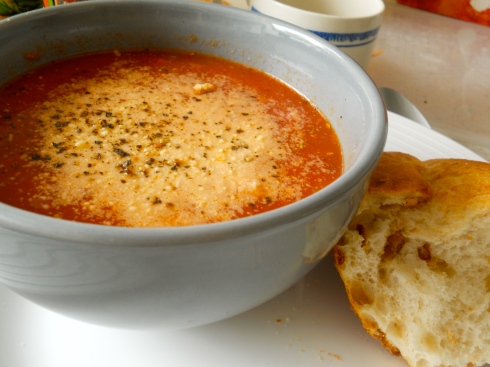
Today was a pretty miserable day, weather-wise. It was a pathetic excuse for an approaching-the-middle-of-Spring day, with rain and clouds and wind and all things sad. I was reluctant to venture out in the cold but needed something for lunch. All we had on hand was a tin of tomatoes, a tin of beans and the usual staples like garlic, onions and dried herbs. And because of the dismal weather, all I really wanted was a bowl of hot, steaming soup and some carbalicious bread.

I pretty much bung everything in a pan and left it for ten minutes to cook – another example of my indolent ways – but the results were bowl-lickin’ good. The tomato became rich and sweet, heady and fragrant with garlic and herbs. The addition of chili gave the soup a warm and hearty kick. The beans added a mellow flavour and gave the soup substance and stodge – perfect for a rainy day in.

Tomato and Cannellini Soup.

Tomato and Cannellini Bean Soup

Serves 2

1 TBSP olive oil

2 large cloves garlic, peeled and chopped

1/2 medium brown onion, peeled and chopped

1 400g tin crushed tomatoes

1 400g tin cannellini beans, drained and rinsed

2 tsp mixed dried herbs

1/2 tsp chili flakes (optional)

3/4 cup water

salt and pepper

grated Parmesan, to serve

1. In a medium saucepan, heat the olive oil.

2. When hot, add the garlic and onion. Fry for five minutes, until fragrant.

3. Add the tomatoes, beans, herbs, chili flakes and water and stir to combine.

4. Simmer for ten minutes and season to taste.

5. Serve with grated Parmesan.

Impromptu Guacamole.

27 Sep

When making my trip to the local supermarket, I intended to leave only with a bag of self-raising flour, a block of dark chocolate and an onion (don’t get too excited here – some of my recipes may be weird but that’s just pushing it) but fate, or a large sign advertising cheap food, instead led me to an enormous bucket of overripe avocados.

Normally I’m afraid of even going near avocados at the supermarket. I worry I’ll do something completely irrational – like buying one. Lately I’ve only ever seen them hovering around the $3-4 per unit mark and have subsequently avoided them so as to prevent any outlandish spending. But today, these little green beauties were only 99c each. Yeah, you heard right.

I bought three with the intention of savouring them over a few days but as I got home, remembered I had a friend to entertain tonight. I grabbed whatever we had on hand (and, although sacrilegious, used white vinegar instead of lime) and whipped up some very basic, but very delicious, guacamole.

To me, nothing gets a party started better than a giant bowl of guacamole goodness. But clearly I need to get out more.

Guacamole.

Guacamole

Serves 2-3

2 large ripe avocados

1 TBSP mayonnaise (preferable good quality whole-egg – that sugary stuff is just weird)

1 tsp dried chilli flakes

1 TBSP white vinegar

salt and pepper

* You can add fresh coriander, garlic and tomato to this to make it more authentic. You can also use sour cream instead of mayonnaise – I just didn’t have any lying around.

1. Scoop out the flesh of the avocados and place in a large bowl.

2. Add the mayonnaise, chilli and vinegar and mash to combine.

3. Season well with salt and pepper.

4. Serve.

The Soup Strikes Back.

20 Sep

Following my flatmate’s bout of food poisoning (to me, minor; to her, ghastly), I was forced to forgo making a rich lasagna for dinner and instead replace it with something a little less heavy and a little easier to digest.

The brief was that it couldn’t require much effort on her part, had to involve a broth and absolutely had to contain glass noodles. The answer here was obvious: I’ve already hammered on about the healing properties of soup, and what better way to really rehash a tired argument than to blog about it again?

This time around, the soup was light and fragrant and filled with fresh ingredients. The chicken remained tender and moist and the bok choy added a nice dose of clean, natural flavour. If possible, I much prefer using fresh vegetables over tinned or even frozen. There’s something invigorating about eating pure and wholesome vegetables that you can’t really emulate in a cylindrical piece of aluminum or a plastic bag. Buy in season and, if you live near one, buy from a fruit and vegetable market, such as Paddy’s in Sydney. You save money this way and also get the most bang for your hard-earned buck in terms of freshness and flavour.

The use of fresh vegetables also really ups the healing ante with the addition of extra vitamins and minerals. It was the perfect antidote to my flatmate’s ailments and the best way to silence her cries of pain (admittedly only for a lowly ten minutes) as she noisily slurped it down.

Chicken, Noodle and Bok Choy Soup.

Chicken, Noodle and Bok Choy Soup

Serves 4

4 chicken drumsticks

1.5L chicken stock

1/4 cup soy sauce

1/2 tsp powdered ginger

200g dried rice sticks (also known as rice noodles)

1 bunch bok choy, washed and roughly chopped

pepper, to taste

1. Place the stock and the chicken drumsticks into a large pot and bring to the boil.

2. Reduce to a simmer and add the soy sauce, ginger and pepper.

3. Simmer on medium heat for around 40 minutes or until the chicken is cooked through. Pull a piece out and cut open to check.

4. Add the rice noodles, cover with the soup stock and cook for a further 10 minutes or until the noodles are cooked through.

5. Add the chopped bok choy and cook for another 5 minutes.

6. Check the seasoning and add more soy sauce accordingly.

7. Remove from the heat and ladle into bowls to serve.

* If you so desire, you can shred the chicken off the bones after they’re cooked and re-add it. Much to my flatmate’s embarrassment, I’m an infamous bone-gnawer and prefer to keep it on.

Seriously Simple Soup.

30 Aug

When times get tough, soup is what’s called for. It’s nourishing, nutritional and tasty (I searched desperately for a synonym for ‘tasty’ starting with ‘n’ to keep the alliterative ball rolling but only thought of ‘nommy’, which probably doesn’t even exist and, if it did, would just be plain ridiculous. But anyway). There’s something comforting in a bowl of hot soup. Memories of bad days and general teen angst are brought back by the only cure all: my mother’s chicken and vegetable soup. Potato soup will forever remind me of my Ukrainian grandmother. Pumpkin soup will always conjure up the first time I made soup myself, as a naive 12-year-old who thought adding cheese was a good idea.

Following the bake-a-thon, which proved to be fantastically therapeutic, I decided to up the healing ante and make some chicken and corn soup for my dear flatmate. Admittedly I’ve always been wary of the stuff – finding the varieties available at local Chinese restaurants strangely comparable to glue. An excess of corn flour (and Lord knows what else) means I’m always left with that claggy mouth feeling and a bowl of unfinished gloop. But I decided to persevere, if only for the sake of household peace.

Searching through recipes for the soup, I was saddened to find that most of them contain bacon, shallots, sesame oil, ginger and chicken breast – things that, sure, probably make the dish undoubtedly delicious, but things that I certainly can’t afford for one lowly meal.

So we KISSed – and for all of you that know us, no, this does not put to rest those rumours – by Keeping It Simple, Stupid. We omitted pretty much everything and made it a very basic, but nevertheless flavoursome, dish. By all means add the aforementioned ingredients to make it even better but, if the only thing at your disposal is a few tins of corn and some low-grade meat, go with my option.

Chicken and Corn Soup.

Chicken and Corn Soup

Serves 2

2 chicken legs

1 400g tin of corn kernels

1 400g tin of creamed corn

2 cups of chicken stock

1 TBSP soy sauce

1/2 tsp ginger powder (optional)

2 eggs (optional)

salt and pepper

1. Place the chicken legs on a roasting tray and sprinkle with salt and pepper.

2. Roast them for around 30 minutes in a 200C oven, turning occasionally for even browning.

3. Remove from the oven and set aside to cool.

4. In a large pot, place the corn kernels, creamed corn and chicken stock.

5. Bring to the boil and then reduce to a simmer.

6. Add the soy sauce and ginger powder and season to taste.

7. Using your fingers, tear the meat off the chicken legs and add to the soup.

8. Leave to simmer for 10 minutes and then remove from heat.

9. Ladle into bowls and stir an egg through each one.

Salad at a Steal.

19 Jul

To me Winter is all about warm things. Fudgey, oozy, gooey, sticky, creamy, carby things. Pasta, stew, potatoes, roasts and pies are all such things that come to mind. I’ll more than happily eat these things day in and day out but sometimes even the most gluttonous of people can tire of constant stodge.

I’ve been craving a salad for some time now. I think my salad strike has been going on since early April, when Sydney’s ridiculous weather patterns decided to become prematurely freezing. Don’t get me wrong, I’ll eat vegetables in Winter if they’re served up warm, but sometimes life just calls for a salad. As they say (or really, they should) if life gives you lemons, make an Italian vinaigrette.

The wonderful thing about salads is that they can be as basic or elaborate as whatever your tastes and budget allow. Often mine consist of week-old lettuce and a tin of tuna – disgusting, I know, but when the only other option is beef-flavoured two-minute noodles, it makes perfect sense. Back in the good ol’ days when three-quarters of my paycheque didn’t go towards rent, my salads were a little more appealing: nuts, cheeses, vegetables like sweet potato and beetroot and various meats made delicious additions to exciting leaves like baby spinach and rocket. These days I’m stuck with iceberg.

But that doesn’t mean a good salad has to be an expensive one – the following recipe cost me a little under $2 for one serve. It can be easily altered with ingredients added, omitted or changed altogether. In the past I’ve put in red onions, cheese, chopped up pickles and corn – following, of course, a hefty bonus at work.

Tuna, Cannellini and Cherry Tomato Salad.

Tuna, Cannellini and Cherry Tomato Salad

Serves 2

One 400g tin cannellini beans, drained and rinsed

One 95g tin tuna in springwater

250g cherry tomatoes, chopped in half (usually these are really expensive, so normal tomatoes can be used)

1/4 cup flat-leaf parsley, roughly chopped

Dressing

2 TBSP olive oil

2 TBSP balsamic vinegar

salt and pepper

1. Mix all the salad ingredients in a large bowl.

2. Mix all the dressing ingredients in a small bowl or shake in a jar to combine.

3. Toss the two together and season with salt and pepper.