Tag Archives: baking

I’d Tapenade That Part II. Or, I’m too lazy to devise a clever title.

21 Jan

I’d like to tell you that the reason I haven’t posted in almost two months is because I’ve spent my summer break in Mykonos, lazing about beside the azure waters of the Mediterranean drinking ouzo and developing a steamy romance with a charming, muscular and deeply tanned Greek boy named Kostos.

But the sad reality is that I’ve actually been watching re-runs of Project Runway and eating cheese. So really, I’ve got no excuse.

Amongst all this laziness, however, my flatmates and I found the time to host an evening soiree (how’s that for tautology?) so we could show our parents our new abode. Now don’t get ahead of yourself here and assume I spent hours in the kitchen preparing. Oh, no. Instead I decided what I was going to make roughly three hours before they were due to arrive.

But the beauty of this recipe is that it only really takes half an hour to prepare and most of the ingredients can be found in your cupboard or fridge. It builds on a recipe I devised a few months back, albeit with a little more pompousness thrown in for good measure. Green olive tapenade* spirals are an easy and cheap addition to any soiree, evening or otherwise (which doesn’t really make sense) and are also quite delicious. Plus you might be able to get away with telling people you learned the recipe off a little old Greek woman on your trip abroad.

*As a side note, my computer tried to auto correct ‘tapenade’ to ‘tapeworm’. Well, I thought it was funny. But I’ve also spent the last two months in front of my television.

Green Olive Tapenade Spirals.

Green Olive Tapenade Spirals

Makes 32

1 quantity of green olive tapenade (recipe found here)

4 sheets of puff pastry, thawed

olive oil to brush


1. Preheat the oven to 200C and grease two baking trays.

2. Cut each sheet of pastry into eight strips.

3. On one end of each strip, place a small dollop of tapenade and roll into a spiral.

4. Repeat with remaining pastry.

5. Place the spirals on baking trays and lightly brush each one with olive oil.

6. Bake in the oven for around 15 minutes or until golden brown.

Reigniting the Passion.

8 Dec

For regular readers, the title of this post will make perfect sense – after having outdone myself in the laziness stakes and avoiding posting in over two weeks, I’ve finally found the inspiration needed to break free of the barbarically restrictive shackles of pure and unadulterated sloth. Or more, I’ve noticed my daily average page views have dipped to the wrong side of five.

Now for those that know me personally, you’ll know I’ve got a new flatmate. And for those that know her personally, you’ll know she loves to eat. So in an effort to both impress her and quell her relentless cries for food, I decided to whip up a deliciously moist (I hate the word but here it seems apt) banana, passionfruit and ginger cake, inspired by a recipe from The Australian Women’s Weekly’s bible, Bake.

The best part about this cake is that almost all the ingredients can be found in the fridge or pantry, or the slowly becoming moldy fruit bowl. I was happily able to continue in my constant state of humdrum lethargy and completely steer clear of the supermarket. And the other advantage was that it kept well in the fridge for almost two weeks, meaning constant nourishment for my darling demanding flatmate.

* As a side note, I will gladly acknowledge that this is my worst title to date.


Banana, passionfruit & ginger cake.

Banana, Passionfruit & Ginger Cake

Serves 12

125g butter, softened

3/4 cup (165g) firmly packed brown sugar

2 eggs

1 1/2 cups (225g) self-raising flour

1/2 tsp bicarbonate soda

1 tsp powdered ginger

1 cup mashed banana (roughly two large bananas)

1/2 cup (120g) natural yoghurt

1/4 cup (60ml) milk

Passionfruit Icing

1 1/2 cups (240g) icing sugar

2 TBSP passionfruit pulp, approximately

1 tsp powdered ginger

1. Preheat oven to 180c/160c fan-forced.

2. Grease 22cm round cake pan and line base with baking paper.

3. Beat butter and sugar in a small bowl with electric mixer until light and fluffy.

4. Beat in eggs, one at a time.

5. Transfer mixture to a large bowl; stir in sifted dry ingredients, banana, yoghurt and milk.

6. Spread mixture into pan.

7. Bake cake about 50 minutes and then stand in pan for 5 minutes.

8. Turn, topside up, onto a wire rack to cool.

9. Meanwhile, make passionfruit icing: Sift icing sugar into a small bowl and stir in enough of the passionfruit pulp to give a thick pouring consistency. Add powdered ginger to taste.

10. Spread the cake with the icing and serve.

For when your world comes crumbling down.

23 Nov

When thinking about my blog the other day (as I often do. Too often, perhaps. I need a life. I also need to stop putting the grand majority of what I write in brackets) I realised it had been over two weeks since I last posted. Some of you may welcome this extended break from me spamming your Facebook newsfeeds with self-indulgent blab but I’m sure my one (finally!) subscriber is missing me. C’mon, enlargements4u@mail.de, admit it.

I made this recipe almost two months ago when my flatmate and I were feeling particularly angsty about university. We were approaching crunch time (i.e. last-minute essay pumping time) and needed sweet nourishment to last the night*. All we had was a sad green apple, some sugar, vanilla, spices and oats. OK, so that’s a bit of an exaggeration and we clearly survive on a bit more than that, but mouldy pasta does not a fine dessert make.

I’d also recently bought some adorable little ramekins and they were still begging to be used. So, if you haven’t already guessed from the puntastic title, apple crumble was the order of the evening.

This is probably the easiest dessert ever in the history of mankind ever to make. Seriously. You can use whatever scabby fruit you’ve got lying around and can even mix them all together to create some kind of wonderful concoction. This recipe uses oats but I’ve heard oats aren’t supposed to be used in the topping. Well I say to hell with tradition and here’s to cheap sustanence.

*I’m going to be honest here and admit we were actually preparing for a late-night Gossip Girl marathon.


Apple crumble.

Apple Crumble

Serves 2

1 medium green apple, peeled and chopped into cubes

1 TBSP caster sugar

1 tsp cinnamon

1 cup water

40g butter

1 TBSP plain flour

3 TBSP rolled oats

1 TBSP raw sugar

a few drops of vanilla essence

1. Place the apple, sugar, cinnamon and water in a medium saucepan and bring to the boil.

2. Reduce the heat and simmer for 10 minutes or until the apple is cooked through.

3. Remove from heat and leave to cool.

4. Preheat the oven to 180C.

5. In a large mixing bowl, rub together the butter and flour until the mixture resembles fine bread crumbs.

6. Rub in the oats, sugar and vanilla and set aside.

7. Grab two ¾ cup capacity ramekins.

8. Drain the apples and place half in each ramekin.

9. Top with the crumble mixture.

10. Place the ramekins on a baking tray.

11. Place the tray in the oven for 20 minutes or until the tops of the crumbles are golden. You may need to put the grill on for a few minutes to get a nice topping.

12. Remove from the oven and serve with lashings of cream or ice cream, quantity depending on mood.

Ain’t Potato the Sweetest Thing.

2 Oct

As you can see, I have an uncanny knack for appropriating song lyrics. A high point (or low, depending on which way you look at it) was when my flatmate and I changed the lyrics to ‘California Gurls’ (sic) by Katy Perry and instead made the song about California rolls. We even proposed taking it to our local sushi joint so they could frame it on the wall. Look, it made sense at the time.

So OK, I might not be destined for a lifelong career in lyric appropriation (if there is such a thing) but I can show you how to make a mean quiche. And ultimately that will take me further than wailing at the top of my lungs about how I know a place where the sushi’s really fresher.

Quiches are so easy and, in their most basic form, only take a matter of minutes to whip up. The extra bonus is that they stretch for days, making excellent cold lunches. I was lucky that I had the time to make my own pastry but by all means take the cheat’s way out and just use store-bought shortcrust. The filling can be chopped and changed according to what you like and what you can afford. Ham, chicken, cheese, herbs, tomatoes and various other vegetables make wonderful additions. And don’t do what I stupidly did and spend $2.50 on a single sweet potato – use pumpkin as a cheaper substitute.

I can assure you that this quiche is so good, the club can’t even handle it right now. I really don’t know what that means.

Sweet Potato and Caramelised Onion Quiche.

Sweet Potato and Caramelised Onion Quiche

Serves 3-4 (for days)

Pastry:

1 3/4 cups plain flour

125g chilled butter, chopped

1/2 tsp salt

2 tsp iced water

Filling:

2 TBSP olive oil

500g sweet potato, peeled and diced (or pumpkin)

1 large brown onion, peeled and sliced into rings

1 tsp brown sugar

4 eggs

1/2 cup milk

1 TBSP dried mixed herbs

salt and pepper

1. In a large mixing bowl, rub together the butter, salt and flour with your fingers until the mixture resembles fine breadcrumbs.

2. Add the water and combine to form a dough. You made need to add more water or flour, depending on the consistency of the dough. It should resemble play dough.

3. Wrap the dough in cling wrap and refrigerate for 30 minutes.

4. In a medium saucepan, place the sweet potato and enough water to cover it. Add a pinch of salt. Bring it to the boil.

5. Remove the sweet potato from the heat when it is just cooked through and drain. Leave to cool.

6. In a medium fry pan, heat 1 TBSP of the olive oil.

7. Add the onions and fry until soft.

8. Add the sugar and keep frying until the onion caramelises. Remove from heat and leave to cool.

9. Preheat the oven to 200C and grease a 22cm pie dish or tart tin.

10. Remove the pastry from the fridge and roll out until it’s big enough to cover the dish/tin.

11. Line the dish/tin with the pastry and place in the fridge for a further 15 minutes.

12. Whisk the eggs with the milk and herbs.

13. Add the cooled onion and season to taste.

14. Remove the pastry shell from the fridge and place in the oven for 15 minutes.

15. Remove from the oven and cover the pastry with the sweet potato. Then pour over the egg mixture.

16. Reduce the oven temperature to 180C and bake the quiche for 30-40 minutes or until the top is slightly browned.

17. Serve.

Big Quiches in Little Paris.

6 Sep

I’ve said it before and I’ll say it again – buttery pastry makes the world go round. Actually, come to think of it, I don’t think I’ve ever uttered these words. But fear not, dear friends, for the aforementioned statement is not an entire lie. I now have reason to say that, in fact, the annual complete revolution of the earth on which we live is only possible due to flaky, rich and sumptuous puff pastry making it so.

A while ago, a dear friend of mine told me about a little patisserie that has recently opened on Glebe Point Road, Glebe, with the promise of taking me there to try its delicious wares. Unfortunately various aspects of life got in the way and it wasn’t until last week (some three months later) that we finally got to go, along with another friend and fellow blogger, Eliza.

We all agreed that a patisserie was exactly what Glebe was screaming out for – sure, there are a few bread shops along its main strip, but nothing like the little piece of French cuteness that is La Banette. I believe the flagship store is in Avalon – in other words, a very distant trek – making a second shop a fantastic idea.

The adorable exterior of the shop.

Upon entering La Banette, we noticed the lack of dining space. My laptop became a makeshift table as we huddled around it on little benches. I’d estimate there’s seating for about six or seven people so advise takeaway or coming during off peak times.

However this was all remedied as we were struck by the awe-inspiring abundance of assorted sweets, cakes and pastries. There are the usual options like croissants (and its many varieties), lemon meringue tarts and eclairs but there are also a few less well-known additions: a creme caramel tart, different types of meringues and sweet brioche. Savoury options included rustic-looking sausage rolls, pies and quiches. There’s also loaves of bread which, although a little more pricey than your average loaf of Tip Top, are surprisingly affordable in comparison to those at other bakehouses.

The delicious display.

We decided sharing was the best option – more variety with less of that guilty feeling after devouring the whole thing on your own. And it makes it cheaper.

The quiches looked too good to pass up so we settled on spinach & bacon and Provencale (mixed vegetable) at $5 each. The pastry used for both was golden, buttery and absolutely exquisite. I would go as far as saying it’s the best I’ve ever had and without a doubt enough to make both the earth and my head spin. The top was crunchy and flaky, as it should be, whilst the bottom remained soft and smooth without being soggy. They were each enormous, too, making them wonderful value for money.

Spinach and bacon quiche.

The spinach and bacon quiche was my favourite – the saltiness of the bacon contrasted nicely with the mellow taste of spinach. The egg, cream and cheese mixture inside the quiche was perfectly silky and even good enough to change an egg-hater’s mind. Part of me regretted agreeing to share as I realised I could happily consume the entire thing.

Provencale (mixed vegetable) quiche.

The Provencale (mixed vegetable) quiche was also quite tasty and equally as superb in its pastry and egg-mixture qualities. It contained a generous mix of vegetables with tomato, red capsicum, zucchini and more spinach making an appearance. Sadly this one had been put in to reheat just as we arrived and, through obviously not wanting to make us wait too long, it was pulled out a bit prematurely. The inside was cold, making it a little less satisfying than the first.

Raspberry meringues.

A trio of creme caramel tart, almond meringue and cherry and almond tart.

We umm-ed and aah-ed extensively while trying to choose dessert. The range of options was enormous and having three different palates to satisfy made the job even harder. We decided on the slightly unusual creme caramel tart and almond meringue as well as the more common cherry and almond tart.

The meringue was unlike any other I’ve had before – the timeworn variety is usually a crunchy and tasteless mound that shatters upon first bite, but this one was a far cry from familiarity. The outside was still brittle and delicate and produced a few crumbs, but the inside was soft, fluffy and chewy. The flavour was a nice and subtle hint of almond.

The cherry and almond tart was pleasant, with fat bursts of slightly sour cherry punctuating the sweet almond meal base. It was nothing I hadn’t tried before but was still a satisfying sweet hit.

The creme caramel tart was the star of the dessert show – a plump and supple creme caramel atop yet another perfect pastry base. In between the two was the odd, yet surprisingly scrumptious, addition of a thin layer of sponge soaked in some kind of rose-flavoured syrup. I never would have though to pair rose with creme caramel but it worked oh so well – the floral sweetness of rose had a wonderful aftertaste.

Many apologies but I failed to write down the prices of the desserts. Most were in the $4 – 4.50 range, with the exception of the meringues and the mini-desserts (smaller versions of the originals) which started at around $1.20. When I visit again (which I undoubtedly will) I’ll find exact prices.

In total, though, we paid $18 amongst three of us. Only $6 for a tasting menu of both sweet and savoury delights and the best pastry you’ll ever try? If that’s not enough to convince you, do it for the sake of earth.

La Banette Patisserie

18 Glebe Point Road, Glebe

Ph: 02 8095 9688

Bake Away Your Blues.

16 Aug

I get emotional a lot. No, don’t worry. This won’t be a rant about the perils of student living and the amount of work it seems to take to keep things afloat – uni work, work work, social work (and not the kind that benefits society), love work and all that other mundane work – but I just thought I’d establish that sometimes life gets too much.

I could take the easy way out and drop out of uni, waste glorious amounts of time and eat myself stupid, whilst being a full time blogger that earns zilch from her craft but does it anyway to entertain her one reader – but that doesn’t seem all too far removed from what I do already. And there’s an easier way to do away with student blues.

I know I’ve harped on about it before but I’ll torture you all and do so again.To me the best way to distract myself from all that’s gettin’ me down is to bake my little heart out.

Today I had a strong urge to make choc chip cookies. There’s something nostalgic and cheerful about them that is the perfect antidote to, well, life. Most recipes call for actual chocolate chips but a look at the price of even the smallest packet was a very rude awakening. To me they’re poor value for money unless you buy a generic brand, which I’m often wary of. So instead I say take the cheaper way out and buy a large block of chocolate. Not only is it more affordable, you can also get a bit of variety to spice up your biscuits – hazelnuts, almonds, and other types of nuts make wonderful additions.

Following my bake-a-thon my emotions are a little more stable. The therapeutic nature of baking lies in its rhythmic calm: sifting flour, measuring things and mixing and pouring and licking the bowl. There are no mentions of Foucaultian theories or global economics or the human anatomy. No customers to pester you with ridiculous questions. No drama, no fights, no plot lines to rival a bad daytime soap. The only work involved is easy and makes perfect sense and produces a delicious end result. Not only will you cure your own bout of doom and gloom but you’ll probably make someone else’s day a little sweeter, too. Naw.

Hazelnut Choc Chip Cookies.

Hazelnut Choc Chip Cookies

Makes 20

150g butter, softened

1 tsp vanilla essence

3/4 cup caster sugar

3/4 cup plain flour

1/4 cup corn flour

200g hazelnut milk chocolate (any type of chocolate is fine), roughly chopped into choc chip-sized pieces

1. Preheat oven to 180c/160C fan forced. Grease an oven tray and line it with baking paper.

2. With an electric mixer, beat together butter, vanilla and sugar in a medium bowl until light and fluffy.

3. Sift the two flours into the butter mix and stir well to combine.

4. Add the chopped chocolate and combine.

5. Using your hands, shape the dough into tablespoon-sized balls and place 5cm apart on tray.

6. With your fingers or with a fork, flatten the balls slightly.

7. Bake in the oven for 15 minutes or until the cookies are golden brown.

8. Remove from oven and cool on trays.

The Glorified Tomato Pie.

28 May

I wanted to be a bit wanky and pretentious this particular evening. And what better way to do it than with a tomato tarte tatin with caramelised onions, fresh basil and a balsamic reduction?

Lordy, I sound like I should really get into menu writing – if there is such a profession. If there is, though, I’m ready and willing to drop out of uni and give Matt Preston a run for his money in the snooty stakes.

Sadly the reality is that this was really a tomato pie with some onions, herbs and a pretty questionable vinegar and honey concoction splashed about on top. But such is the power of pompous vocabulary.

Anyway, I digress. A recipe on Taste (see bar on the right) inspired me to create this tomato thang for some guests we were having over. But the original recipe, to be honest, didn’t seem to have the right amount of pizazz – that is, I couldn’t really ham up and wankify its description in its initial form.

So I added some fresh basil leaves (from our, surprisingly, still alive basil plant) and caramelised onions and altered the balsamic vinegar component a little bit.

The end result was quite ‘tasty’ (I quote my flatmate here) and made me look like the ostentatious chef I so aspire to be. In reality? This recipe couldn’t be easier. And I couldn’t be any further from the aforementioned description.

Tomato tarte tatin

Tomato Tarte Tatin with Caramalised Onions, Fresh Basil and a Balsamic Reduction.

(translation: Tomato Pie with Some Onions, Herbs and a Pretty Questionable Vinegar and Honey Concoction)

Serves 4

For the pastry:

100g (2/3 cup) plain flour

1 tsp salt

50g dairy spread

1 TBSP cold water, approximately

400-500g baby roma tomatoes (depending on the quantities available to buy)

2 large onions, thinly sliced

2 TBSP olive oil

1 tsp sugar

6 or 7 basil leaves

salt and pepper, to taste

For the reduction:

1/2 cup balsamic vinegar

1 TBSP honey

For the pastry:

1. Rub the flour, salt and dairy spread together with your fingers until the mixture resembles fine breadcrumbs.

2. Add enough water so that the dough comes together to form a ball. Make sure it’s not too sticky – if it is, add a bit more flour accordingly.

3. Wrap the dough in plastic wrap and refrigerate for 30 minutes.

Meanwhile, make the rest.

1. In a large frying pan, heat the oil over high heat.

2. Add the onions and fry until well cooked – they should be quite mushy and brown.

3. Add the sugar and keep cooking until the onions are well caramelised.

4. Remove from heat and leave to cool.

5. Arrange the tomatoes on the base of a 20cm-round cake tin. Make them look somewhat nice, mainly for the wank factor. And don’t use a springform cake tin – I did and ended up almost causing an oil fire.

6. Spread the basil leaves around on top of the tomatoes.

7. Top with the cooled onions.

8. Take the pastry out of the fridge and roll out so that it is big enough to cover the other stuff – if there is excess, just roll it back so that it forms a kind of ring around the edge. For a better explanation, click here.

9. Preheat the oven to 200C.

10. Cover the tin with plastic wrap and put the whole thing in the fridge for 10 minutes – this ensures the pastry doesn’t shrink while cooking.

11. Meanwhile, make the balsamic reduction/vinegar and honey concoction. In a pan over medium-high heat, put the balsamic vinegar and honey. Keep stirring and eventually it will turn into a thickish, molasses-resembling sauce thing. Don’t be deterred by guests telling you it resembles car oil. Looks are deceiving.

12. Take the tart out of the fridge and place in the oven. Bake for 25-30 minutes. You can put the grill on for the last few minutes to ensure the pastry browns up nicely. But watch it – that thing is wild and can turn your tart black in seconds.

13. Remove from the oven and turn out onto a plate so that it is upside down. Again, refer to here for better instructions. But ignore the wire rack thing.

14. Drizzle with the reduction, season with salt and pepper, garnish with something green for extra wank (I promise this is the last time I’ll use this word) and serve.

NOTE: If serving to guests, preferably use the first description. Cravat optional.

Baking for Mama.

12 May

I loathe doing uni work and will do almost anything to avoid it. Facebook, re-ordering the pantry, scrubbing the shower… You name it, I’ll do it.

But my most preferred method of procrastination? Baking.

The bonus here is that not only does it keep me from doing what I hate, I also really, really enjoy it. To be honest I’m no fan of moving the rice over to the right and relocating the sultanas to the top shelf, but baking? It’s the most enjoyable way to ensure that no work gets done.

This particular baking day, I also had a legitimate excuse to spend time in the kitchen. It was Mother’s Day, which, to me, screams out for a bevy of baked goods.

Originally I had envisaged about four or five different things for my Mother’s Day morning tea, spending the day prior whipping up muffins, scones, slices and the like. But absolutely shocking time management (well, prioritisation skills) on my part meant I was forced to forgo an elaborate sugar-butter-carb-filled feast and instead limit it to two choices. I was, however, amazed I managed to devise recipes, buy ingredients and produce two things within the space of an hour and a half on Mother’s Day morning – and appalled that I couldn’t even apply this kind of determination to my work.

The first recipe comes from my baking bible: The Australian Women’s Weekly mega-tome, Bake. For all you language purists out there, no, I don’t think ‘mega-tome’ is an acceptable English word, but neither are ‘tweet’ nor ‘Yogalates’. And if they’re good enough for Oxford, ‘mega-tome’ is good enough for me.

Anyway, the recipe was for chocolate lace crisps, criminally rich chocolate biscuits that don’t really live up to their name. They’re not crisp at all – ‘crisp’ biscuits seem to imply light taste and texture, a small indulgence that won’t do much to your waistline. A wafer, perhaps.

But these ones were instead loaded with chocolate, butter and sugar, with a dense fudgey texture that seemed more like, well, fudge than anything else.

That’s not to say they weren’t good though, because dayum, they certainly were. They had the most intense flavour and gooey-like-a-pudding centres. I clearly have a penchant for food writing, judging by my fantastic skill with adjectives here.

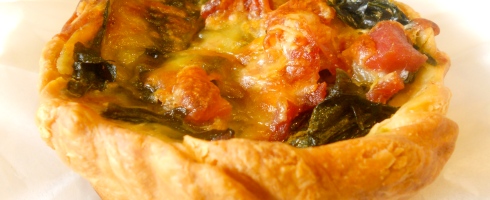
The second thing I made was chocolate custard and raspberry tarts – a recipe I invented that kind of builds on my previous peach torte idea. These were equally as good, if I may say so myself, but admittedly somewhat pricey due to the raspberries. We were lucky enough to have some (which we didn’t pay for) but I suppose you could make do with any other fruit that goes well with chocolate – banana, strawberries and so on. To make them uber-cheap, you could even just go without.

Again, I made my own pastry and again, you could just use shortcrust. Cut rounds using a cup as a guide and press them into a muffin tray.

This time around I cheated by using bottled custard – which ended up making the whole thing a lot cheaper.

Chocolate lace crisps

Chocolate Lace Crisps

Makes 24 (I managed to scrape together 12)

100g dark eating chocolate, chopped coarsely
80g butter, chopped coarsely
1 cup (220g) caster sugar
1 egg
1 cup (150g) plain flour
2 TBSP cocoa powder
¼ tsp bicarbonate of soda (baking powder)
¼ cup (40g) icing sugar

1. Melt chocolate and butter in a saucepan over low heat
2. Transfer chocolate mixture to medium bowl
3. Stir in caster sugar, egg and sifted flour, cocoa and soda
4. Cover and refrigerate for 15 minutes or until mixture is firm enough to handle
5. Preheat oven to 180C/160C fan-forced
6. Grease oven trays and line with baking paper. If you have non-stick trays, just butter should be A-OK
7. Roll level tablespoons of mixture into balls. I think this is where I went wrong – my estimation skills are appalling
8. Roll each ball in sifted icing sugar and place about 8cm apart on trays. Yes, round balls. Not flattened balls. It confused me too
9. Bake about 15 minutes and cool on trays

Chocolate custard raspberry tarts

Chocolate Custard and Raspberry Tarts

Makes 12

For the pastry:
1 ¼ cup plain flour
2 TBSP corn flour
2 TBSP icing sugar
125g cold butter, chopped coarsely
2 TBSP cold water, approximately

For the custard:
500ml bottled custard
100g dark eating chocolate, roughly chopped
1 TBSP unsweetened cocoa powder
2 TBSP cornflour

Plus raspberries (fresh or frozen) to decorate – how many you use (or whether you use them at all) depends on how stingy you are.

For the pastry:
1. Sift flours and sugar into a medium bowl
2. Rub in the butter with your fingers
3. Add enough water so that the ingredients come together
4. Knead the dough on a floured surface until smooth
5. Enclose in plastic wrap and refrigerate for 30 minutes
6. Meanwhile, make custard

For the custard:
1. Place custard in a saucepan over medium heat
2. Once warmed through, add chocolate and stir until chocolate is completely melted and well combined with the custard
3. Sift cocoa and cornflour into the custard mixture and beat well to combine. And I mean beat well – cornflour makes lumps of the worst kind
4. Cool completely

Back to the pastry:
1. Preheat oven to 200C/180C fan-forced
2. Grease a 12-cup muffin tin
3. Remove from the fridge and remove the plastic wrap
4. Divide the dough into 12 equal-sized balls
5. Roll each ball with a rolling pin (I don’t have one – a wine bottle is perfect, as any self-respecting student would know)
6. Place each disc into the muffin tin and mould a little to fit
7. Bake in the oven for 10 minutes, or until the pastry is just golden. They may shrink a bit (mine shrank a lot) but don’t fear – they’ll still work.

To assemble:
1. Fill pastry shells with custard mixture
2. Top with raspberries… or nothing
3. Place in the fridge for at least half an hour so the custard firms up a little
4. Serve

Both of these are even better a few days later, after being kept in the fridge.